Hello, welcome to my army blog as opposed to my army list/gaming blog. This will track the progress of me trying to make my army the best painted and modeled army in my local region in my attempt to win best paint score.
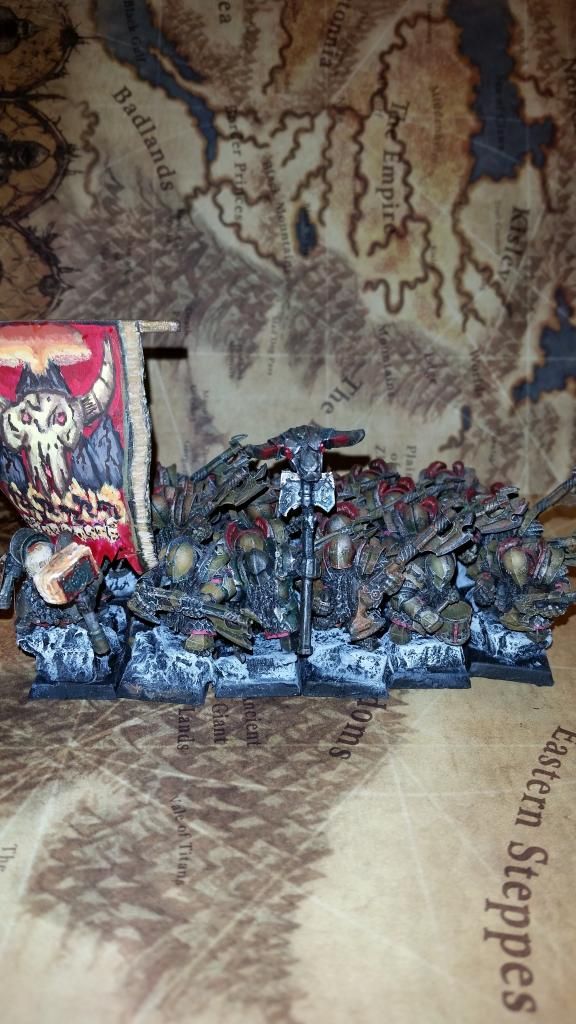
Up first will be my Infernal Guard/Chaos Dwarf rebasing project. Originally they were just on 20mm bases. Now the weird thing about Infernal guard, is that they are pretty huge and really fill up a 20mm base leaving very little room to give grass, skulls, and other cool bits to decorate the base. So how do we fix this? ROCKS! That’s right if we put our Infernal guard on rocks which slightly elevate them we get a very nice effect and we instantly get much needed room to make our bases much more like a diorama.
Now their are many materials to use to make rocks. Some use cork board, other use premade rocks, or other such materials. Me I am cheap, so I will show you how to make rock bases with pink insulation foam, wood glue, and some black house paint +white craft paint.
STEP 1:
Break yourself off a nice chunk of foam. It should be easy enough to manage that you can cut it with a pair of scissors. We cut it with the scissors because it really breaks and gives us an uneven cut, better to mimic rough patches of rock.
Cut the foam with the scissors until you got a relatively small piece.
Now with this piece, cut it again down the center, it should be between 3cm and 6cm high for rnf, you can have some higher here and there to get a more interesting looking unit. Make sure you line up the foam right, and shape it so it fits on your base. You don’t want it to be sticking out of any sides or else your models will not rank up!
Here is the finished piece of foam after all the cutting. If it already kinda looks like a rock, that means you did a good job and are on the right track.
STEP 2:
Now we need to attach the foam to the base. With pink foam, some superglues will melt it and create toxic fumes or other weird things. So I like to use a big glob of Gorrilla Woodglue (the non bubbeling kind).
After that place your “rock” onto the glue and press it down, its ok if it spills out the sides, but make sure you wipe off the edges of the base.
Next we apply a nice thick coat of woodglue on top of the rock foam, to make it smooth, and gives the foam extra protection when we are ready to glue down our minis.
do this to all of the bases and rocks and leave to dry for about 12-18 hours.
STEP 3:
Behold your army of rock bases, already they are intimidating! But lets make them even more scary by painting them.
Firstly basecoat each base with black paint, I prefer flat house paint for all of my basecoating.
Next mix some white craft/house paint with your black to get a dark grey, and give it a heavy drybrush
Keep applying more white paint to get lighter shades of grey, and apply lighter and lighter drybrushes to give the rock nice light grey, and white highlights.
Lastly just give it a straight white drybrush for the final highlight.
Behold your painted rock army!
STEP 4:
Now with the paint dry, it is time to glue down your Chaos Dwarfs. This part it is important to make sure each model will rank up, especially with fireglaives.
The Legion of Azgolag now properly on rocks! (Pardon the missing paint around the shoes)
At this point, you can now add sand to the open areas, and or paint on lava around the rocks. Thanks for reading, more to come :hat off
I believe the issue of an over abundance of blue, was due to my cameras HDR mode, i turned that off and it seemed to help, you be the judges.
Now onto the blog, now that my bases were done, I had the important question to ask, did I want to pursue lava or something else? A passage in the Tamurkhan book on chaos dwarfs, “It [Plains of Zharr] is littered with the scars of vast open mines, fiery rivers of magma, ash dunes, and stagnant pools of foaming yellow and blood red - noxious with toxic spoil.” I wanted to capture the image of this toxic waste environment on the bases of my infernal guard, and I feel like I have achieved that.
Firstly, I went out to the hardware store to purchase the smallest lock washers available. These Washers are unique in that they look like little gears. I figured that since I do not have alot of skulls laying around, nor do I wish to buy them, I would get a decent effect with some of these rusty gears laying around.
(no that d6 is not huge, the washers are just really tiny)
I painted the washers black first, and as they were drying went to town drybrushing shades of brown on my now sanded rock bases. After that, I glued the washers in place, drybrushed them boltgun metal, and hit them with a heavy rust colored wash, I will likely go back with some greenish brown color to make the rust look better.
To get the chemical liquid effect on my bases, I just used the technical paint nurgles rot.
Lastly, here is a pic of my next hellcannon, the projectile coming from its mouth is from the Maggoth Lord box.
Iron Daemon incoming. Thought I would share my unboxing of a forgeworld product since I live all the way in California. This one arrived relatively quickly compared to my last order too which is nice.
Have made some decent progress on my new hellcannon. The hard part about this 40k model is that it is equal parts machine and flesh which really require two different sets of colors, techniques, and most importantly water. Today I just wanted to focus on getting the metal nice and rusted/terrible looking to match up with the rest of my army.
Firstly I drybrushed him with 3 different shades of metal, finishing the drybrush with runefang, then hitting the raised areas with a copper color. I made sure to be careful with the drybrushing and the trim and keep it nice and neat. It might seem counter intuitive seeing how I am just gonna rust him anyway, but it gives me a good start so I am not trying to fix up his coloration in the washing
phase.
Using these 4 colors, from left to right I water them down and just randomly blot the minitures giving a nice spot of color all over, but never completely painting over the miniature with any one wash. This allows for different shades of rust and general filth to be shown on the final product.
Here is an example of the blotting.
This is the end result, a close up of one of the shoulder pads, a nice and ugly rusty piece of metal
@bloodbeard, Yes I am going for the chained angry daemon cannon, I will keep the base the same style as my infernal guard (It will be clutching large rocks and be surrounded by toxic waste and will put down some extra large lockwashers) Additionally, I am going to have to sculpt some handlers, so that will be fun.
The hellcannon is coming along nicely, started the skin this time, will need to go back and reblend some parts to make it look more natural, then add some pinks around where flesh meets metal to show pain/discomforted flesh, then splatter some blood on it. Hopefully I will get some time before the week is up. The biggest bad news is that I got to work during the upcoming tournament, but should be able to play 2 out of the 3 games, so not a total loss, and luckily they do the paint scoring after lunch so I might be able to win that if the competition is not to crazy
Well I finally finished the Hellcannon. And more importantly I figured out how to get my whole natural light to work so no more flash pics!
Anyway, I added the pink areas of flesh, blood, slime, fire, generally just little extra details that help bring my hellcannon to life. Overall I am happy with it, and I feel that I have succesfully conveyed metal meets flesh effect. Additionally the IronDaemon is assembled and primed, and what an annoying model to assemble.
After the Irondeaemon I will return to this hellcannon to add the chains to restrain it aswell as some chaos dwarf handlers, but for now I feel comfortable gaming with it.