Well, I had a few spare minutes a couple days ago, and decided to build some �?~Strange Aeons�?T terrain. A 25mm GW Lord of the Rings Orc is included for scale.
The bases are old dvds. I can’t seem to find anywhere in the town I live in that sells static grass - I think that would be what I need to make the ground surrounding the monolith a bit more interesting. I have some Woodland Scenics ‘blended turf’ which I will probably use.
Here’s a picture of a modular ground section which I’m going to be using as the ‘ground’, upon which scatter terrain will be placed.
The way I made it was by taking a heavier adhesive vinyl tile, and sticking it to some 0.25" foamcore. I trimmed the foamcore so the edges lined up, and taped around the edges (in case moisture made the foamcore warp). After that, I used some more tape to mask out the edges of the board, and used spray adhesive the coat the top in glue, and added some coarse sand I liberated from the local beach. After another spray of the adhesive and another layer of sand, I sprayed on a 4:1 (approximate) mix of water to white glue on the sand and let it dry overnight. I used a paper towel to remove any extra ‘puddles’ of the glue/water mixture which had formed.
The next day, I removed the tape which was masking out the edges and spray painted everything black. When it was dry, I drybrushed it the same way I drybrushed the ground around the standing stone.
And now, another textured ‘DVD’ - the ground has some patches of ‘mixed turf ground cover’ and a more appropriate (though unpainted) miniature. The ‘shrubs’ are pieces of lichen I pulled of a tree a few weeks ago. I pulled bits off until they looked the way I wanted, and crazy-glued them in place.
I’m trying to keep everything consistent by using the same colour palette for everything - I bought some cheap tubes of latex paint which I can easily replace when they run out, so I should be able to keep all the colours the same.
The large ‘ground’ tiles are all 12x12, and are blank, other than texturing and I think I’ll add some ‘ground turf’ to them, and put all the other pieces on additional bases to be placed on top of them. I’m still a bit flustered about the ground cover - as in how to apply it in random patches - but practice makes perfect, right?
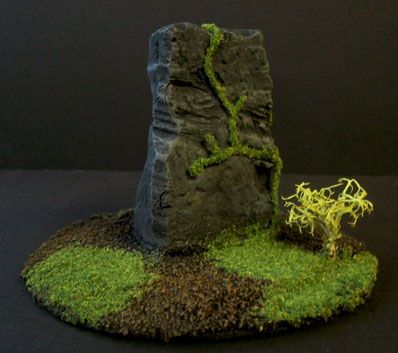
Well, here’s another standing stone… The vine ended up being thicker than I would have liked, but I needed to re-glue flock onto it to cover up a few spots where my fingers rubbed it off.
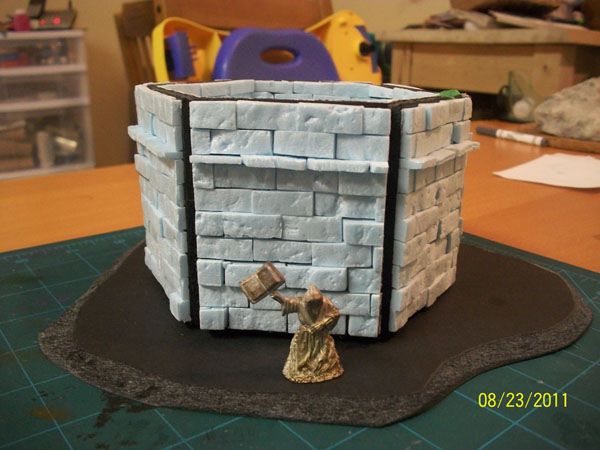
Well, here’s a little building I put together.
The substructure of the walls is foamcore, about 2 3/8" square. On top of that are all the bricks, which are made from blue foam insulation - I cut slices about 5mm thick (or so) and then cut them into close-to-uniform widths and heights - which I then glued to the foamcore. The corner pieces are single pieces of foam. Cutting the foam to slightly varying thicknesses is good, as when they are all randomly placed on the wall there are a lot of good variations in height, which makes the wall more interesting-looking, I think. I also used some more of the ‘blended turf’ to add ‘moss’ to the tops of some of the bricks. It was painted black, and drybrushed with dark grey. I also added a few ‘vines’ like I had made for the previous ‘standing stone’.
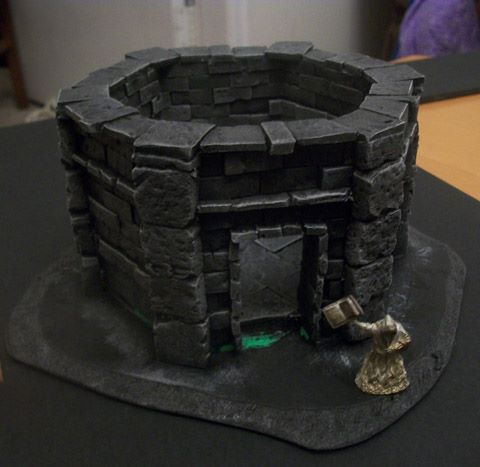
The roof is made of a ton of little shingles, individually cut and placed. It takes quite a while, but I like the decrepit looking result. It was painted black and drybrushed from peak to edge of the roof with burgundy, then some white was added to the mix and it was lightly drybrushed upward to the peak, so just the extreme edges were caught with the lighter colour. Each side of the roof is about the size of a credit card.
The base is a DVD. I glued and beveled a piece of foamcore on top of it. However, when I placed the strutcure on the base, the corners overhung the beveled part, which was a hassle. The fix? Wood filler, the kind of stuff you use to fill nail holes. I used a bunch of that on the base, and pressed the building into it - it worked beautifully. Sand on the base, drybrush with burnt umber and then sepia, and that’s it. To make it match the other pieces I’ve been making, I stuck some lichen ‘bushes’ on the base, and added some more turf flock for some colour.
Looks good. Any risk of the vinyl tile bending and cracking the covering or is it pretty stiff?
The thing that stopped me in the past from making such modular terrain is that it made range-guessing too easy, but that’s not a worry anymore it would seem.
I bought a stiffer tile, not the super-cheap ones (although, they were only about $1.85CAN each). Coupled with putting the foamcore on top and taping it all up, it seems OK. However, I have noticed that one or two of them have bowed a bit, but you can actually bed them back into shape with virtually no damage. What I think I should have done is used a stronger tape (like a fabric based tape, or possibly even duct tape) and, in addition to taping the edges, taped from corner to corner as well, which I think would really help aid against any warping.
I’ve made six of these, and am pretty happy with how they turned out. Being able to store them in a 12" x 12" x 6" space is pretty good, too.
I’m pretty pleased with it as well - especially because, other than the tower I made for the artisan’s contest (I think it was VII), this is the first time I’ve made some terrain.
I got a couple of hours this morning, and started working on another building for Strange Aeons.
This one is more ambitious than the last one - for one, it’s six sided. Also, it will have a removable roof and a fully detailed interior. Also, given the size, It will have a base which is not an old DVD.
The basic shapes were cut out of foamcore - a couple of hexagons and the wall section, as well as a base for everything to sit on. The wall section has only been cut on one side, to allow me to brick the entire side at once - leaving a little gap at the bottom so it will connect to the ‘floor’ section, which is bricked and crazy-glued to the base. There are a couple of hundred bricks on this side.
The bricks and floor tiles were made of thin slices of blue insulation foam, (2-4mm thick) which had one side roughed up and textured prior to being cut into brick sizes. The bricks were glued to the foamcore with white glue.
Hopefully I’ll be able to get more done soon! This is the most ambitious piece of terrain I’ve ever made, which I plan on using in the series of linked scenarios I’m working on. This will be a mysterious place where the ‘Brotherhood of the Eclipse’ hold their rituals…
Consider the old DVD idea stolen (I’m thinking I could use the hole in the middle to anchor a tree with another DVD on the bottom to squish it in place and keep it level). It’s a great idea it keeps the terrain small, strong, level and still cheap because your recycling items. I wish I had thought of it.
Given the level of skill I can already see in the brick wall of your ritual hall I can tell it’s going to be another quality piece. I envy your painting skills. Keep up the good work.
Regarding your idea about squishing another DVD on top of one, I’m not sure how well that would work. As I mentioned before, I glued a piece of foamcore to the top of each DVD and beveled the edge. After that, I added sand and drybrushed. For the disc with the shrubs and ‘faceless mage’ figure, I actually dug into the foamcore in a few spots to get some height variance. I think the best bet might be to glue a piece of foamcore on top, and dig out the 1/4" of foamcore where you want the tree placed. Place the tree, and then use wood filler - the sort of stuff that you use to fill nail holes if you were doing finish carpentry. It’s cheap (I got a good-sized tub at a hardware store for $5CAN) and it dries rock hard. If you did that, and then glued sand and drybrushed the surface (after a black undercoat) you’d probably be really happy with the result!
And here are some more WIP shots - the exterior has been bricked, the interior bricks cut at angles to allow for the walls to ‘bend’ at the corners, and the exterior ones cut as well - it’s held together with a couple bits of tape. A miniature (the unpainted faceless mage) makes another appearance for scale.
Still a lot of work to do - it’s probably 20% done at this point.
The next things I want to do are add door and put the exterior supports at the corners in place - to cover up the exposed foamcore. And the stairs leading up to the door. And try to figure out how to stencil a sigil on the floor. And work on the removable roof… LOTS of work. But, good practice - I’m learning a lot!
Also, it’s funny how big these things get. I was thinking about putting a tree on the base, but I don’t think I’ll have room… Maybe I’ll make a bigger base to put it on.
Well, I FINALLY got some time to continue working on this - sorry about the lousy photo.
I’ve added the corner supports, made the door and door jamb, painted the inside floor and walls, and put some ‘cap’ stones along the seam at the top.
I’m really learning a lot - the ‘uneven bricks’ were created the way they were to make painting easy and add dimension and to make it more exciting visually. However, it gets BRUTAL trying to line things up properly.
For example, there is a tiny foam ‘spacer’ around the base under the walls - the irregularities in the floor tile thickness made it impossible to attached the walls and have them level. Also, I’m thinking that when I initially cut the shapes for the walls, I should have included a flat space the width of the ‘support stones’, so I’d have a place to glue them which is flat. I ended up sawing down the corners to cut off the protruding bricks to make a flat spot to adhere the vertical stones to, which has left a lot of gaps, which I will need to full with putty. I also realized that I should have glued the bricks for those supports from the top down (vs. the bottom up) so they could all be dead even at the top and and variance in height would be at the bottom, which will be hidden by the basing material.
The door worked well - it was a piece of balsa, with some coffee stir-sticks glued on. The ‘nail heads’ are the heads of pins which I cut off and pushed into the wood. Worked pretty well, and it’s removable.
Overall? Yikes - what a pain! However, lesson learned, right? I’m really glad I stared on some smaller projects before moving onto a gigantic one that I’d get frustrated with and never finish!
Hopefully, I can get some more work done and get this thing finished soon!
I really must apologize for the SLOW progress I’m making on this project. I’d planned on having it completely finished… well, a long time ago. Certainly by January. Unfortunately, this is not the case.
However, I have managed to basecoat the outside and paint the outside, bringing out the detail in the brickwork. Here’s what it looks like now:
Luckily, I’ve managed to get the colours of the exterior and interior bricks to match up rather well. I’m REALLY hoping to get the roof finished soon. As soon as that’s done, it’ll be time to texture the base, add some bushes and some ground cover, and a vine or three climbing the edges.
My wife and I bought the ‘Mansions of Madness’ game as a Christmas gift for ourselves, and I quite like the miniatures. So, I sent Fantasy Flight Games an email, inquiring about how much it would cost to purchase another bag of the monsters. I’m not sure why, but they just sent them to me, free of charge!
My Strange Aeons miniatures grow in number!!
I can put together a pretty decent cult!
More on the building soon - I’ve had to figure out a way to cut circles, etc… into bricks and foamcore - which was a lot more challenging than I thought it would be. However, (a little) progress has been made!!