Admiral:
Enjoysrandom shared an interesting idea recently, namely to make cylinder seal press moulds for easy green stuff roll-out of evil dwarf patterns and mythological scenes and possibly writing. One could imagine that this would be useful for all sorts of walls in terrain as well as flat surfaces on scraftchbuilt warmachines.
On the one hand, there is the possibility of interested and crafts-cunning hobbyist trying their hand at making their own cylinder seals for personal use, and on the other there is the future possibility that I or someone else could make a few cylinder seals for casting if it would be a popular enough item for DIY terrain detailing.

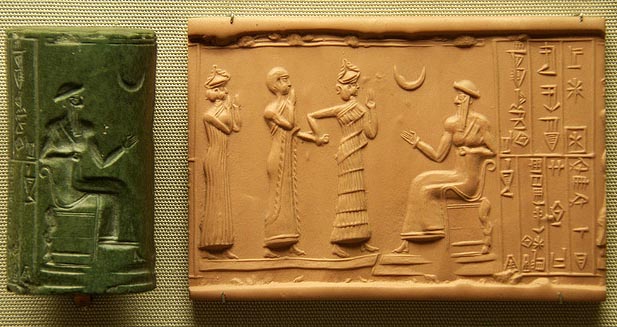
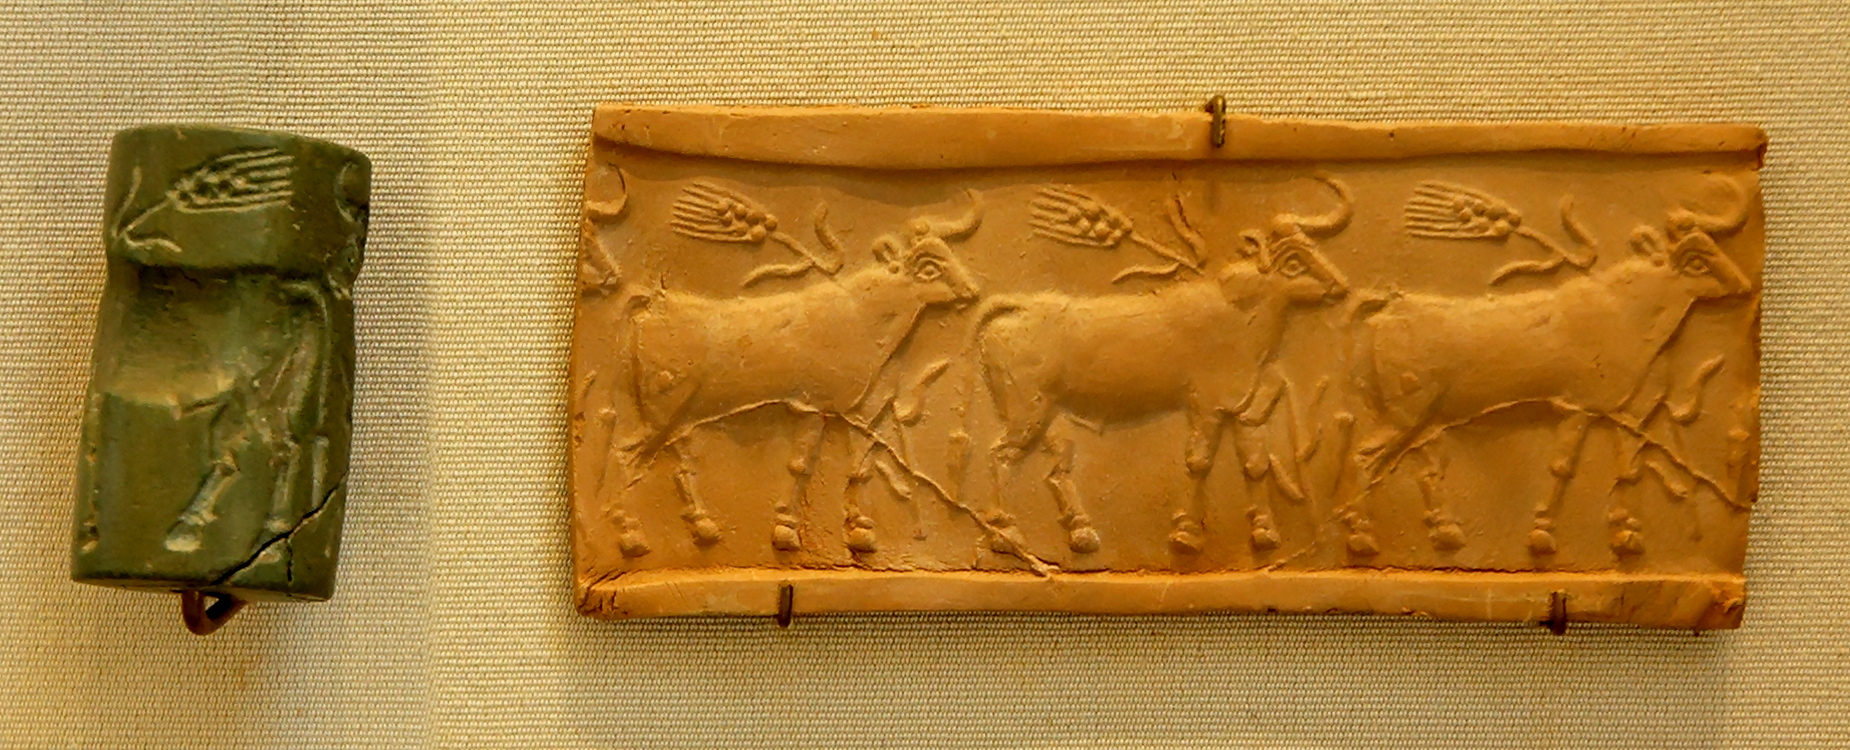
The question, though, is how to make them? A quick search reveals a couple of simple clay tutorials for child activities, one producing raised figures, the other sunk ones. Obviously the raised variant is the one of potential interest for wargamers. I can think of a few ways on a limb on how to make cylinder seals for raised figures in the end results, most of them complicated, but these need not be the only ways, or even the better ways, on how to achieve it. Most of those I can think of complicated and difficult to get right, and that’s before even attempting a repetitive pattern like the one below (not sure I could achieve smooth repetitive ones at all):
Given that this site has got its fair amount of creative and crafty people, how would you go about making a cylinder seal for raised figures?

Also, are there any particular patterns or kinds of scenes which you’d like to see for your terrain and so on, should this ever make it into a commercial project for casting and selling cylinder seals? What would be a good height for the roll-out press mould/finished scene, and would it even be feasible to roll cylinder seals across enough green stuff to adorn large wall surfaces?
Let’s brainstorm, folks. Come with ideas, critiscism and wishlists. There might be some clever way to make this with quite simple means. :hat off
Also, Green Stuff World already does something in this vein:

Enjoysrandom:
Couldn’t have said it better myself Admiral!
Textures for buildings to make the sandstone effect on walls would be great I reckon.
Not to mention effects for different stone textures, dirt textures, decorated runic grounds to wall/floor murals, the list goes on.
Once I have completed more of my army I want to work on building a Ziggurat to display my army on/in.
MDF walls coated in green stuff with rolled on textures sounds easy and strong, perfect for play or display.
Need some real chaos dwarf themes Bulls, lammasus and Big Hats for all!!! :hat off
Jackswift:
A great idea from Enjoysrandom!
Admiral, having seen how well you do relief sculpture work in the details on your models, I suspect you could execute one of these very, very well.
As for wishlists, some Chaos Dwarfish/Assyrian reliefs are first to come to mind. I keep thinking about picking some of these up for basing too, but have never gotten around to it.
I can think of a few variations on how to do this as follows.
In most scenarios, it makes the most sense to sculpt the flat relief scene that the cylinder seal will be a copy of first.
1. To make the cylinder, I would start with a rod of some sort (plastic, or a wood dowel, or even a square shaped rod would work well; square cross section rod might even hold the green stuff better, but would require a bit more material to get an even cylindrical coverage). I can see either working directly with the rod, and cutting in grooves or nicks to better adhere to the greenstuff. Then cover the rod in a layer of greenstuff or similar material as deep as you need it. Make sure it adheres to the grooves, and let it harden just a little bit (enough to keep the bond, but not so much that it will not pick up the relieve sculpture from the flat).
Depending on how deep your relief sculpture is, it may also make sense to attach flat discs to the top and bottom of the section of rod that you are working with. Some glue and a screw through the top of the disc, and down the middle of the rod would work. This will better hold the greenstuff (or whatever you are using) in place and prevent it deforming up or down too much when you roll it over the flat original sculpture. I would still drill holes art intervals through the disc as the greenstuff does need somewhere to go when it is displaced.
Frankly you would probably need to try both with and without discs to see what works best (so I guess this is method 1 and 2). It may be that the space above and below the rod is needed for the greenstuff to deform to when pressed. You can then cut it flat on top or bottom after it hardens.
Carefully roll the created rod over the relive sculpture and voila. You have your cylinder. You would have to experiment or carefully measure the diameter of your rod to ensure the entire relieve fits and does not overlap (unless you want it to).
You might find you have to experiment with making the original figures slightly narrower than you want the final to be. I do not know if the sculpted figures will spread a little in the rolled form, making them wider than the original piece.
3. The second and in my opinion more difficult option would be to craft the cylinder. Again greenstuff on a solid round rod or square cross section rod. The sculpt the desired image directly onto the cylinder. I imagine this method would get easier if you do it often as you figure out what your forms need to look like in reverse. The first few attempts might have some interesting and unexpected results. I suspect that greenstuff might not be the easiest material to work in this manner as it works better using an add on process versus a take away process. A material more like clay would work better. I can see something like Primo or Super Sculpy working better for this type of work. And the need to bake and harden it seems somehow fitting given that some of this original type of work was done in a similar manner in ancient times and baked to harden.
Not sure either of these actually ends up as an ‘easy’ method.
Cheers, JR
Dînadan:
For crafting the cylinder, as Jackswift suggests, how about sculpting/carving/whatever the design on something flat, and then taking a cylinder and coating it in putty and rolling it over the flat design to imprint onto the cylinder, then casting that up like you would a regular mini to make duplicates. Biggest issue might be finding the right diameter to get the whole design on if it’s not repeating, although I think you might be able to get around that if you roll top to bottom rather than side to side.
As for what designs, if you’re doing CD themed ones I’d say how about looking through the fluff forum on here and basing designs off some of the stories there, capturing scenes in the way that in real life scenes from myths, legends and famous battles would be recreated as murals, mosaics, reliefs, etc.
You could do similar for other races by going on fan forums for those factions and reading the fan fic posted there (with authors’ permission of course).
Bloodbeard:
I’m a huge fan of GSW pin rolls. They work wonders. I own three of them.
A few tricks when doing any kind a roll work:
1. Get a clean roll (a plastic pipe works), to even out your putty before rolling the textured one. I find it makes a good difference, than evening the putty with just your fingers.
2. Use Miliput (way cheaper than green stuff).
3. Mix your Miliput with Playdough (or other plastacine). This trick makes it even cheaper and the putty works a lot better with the rolls this way, doesn’t stick.
50:50 works for bases and terrain.
25:50 works fine for the bulk sculpting and then green stuff for finer details on top of it.
These were done in just a couple hours of work. 50:50 mix. GSW factory floor pin roll.

Bloodbeard:
Check out this cool tool as well, ordering this next time I’m getting stuff. I always have some excess putty left, and that can go into this mould.
Rivets, bolts, screws. Perfect for building warmachines, chaos dwarf terrain etc.

