Grimstonefire:
So, a place for us to gather all our collective mistakes (;)) so that those who follow won’t have to.
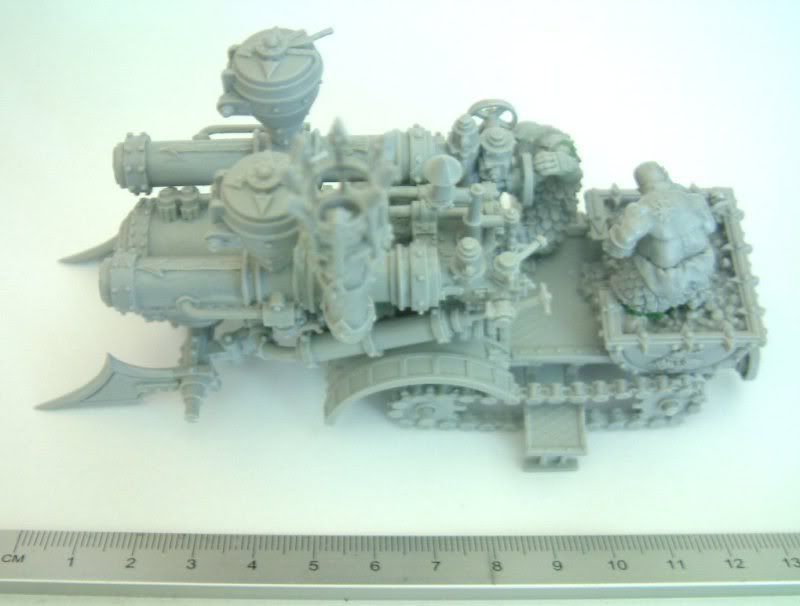
I’ve pretty much finished building mine now.
I have assembled my model in 15 parts for painting:
Whole of the front body section (including front axle)
Rear body section (with gunner and stoker attached).
Separate wheels (6)
Separate hubs (6)
Engineer
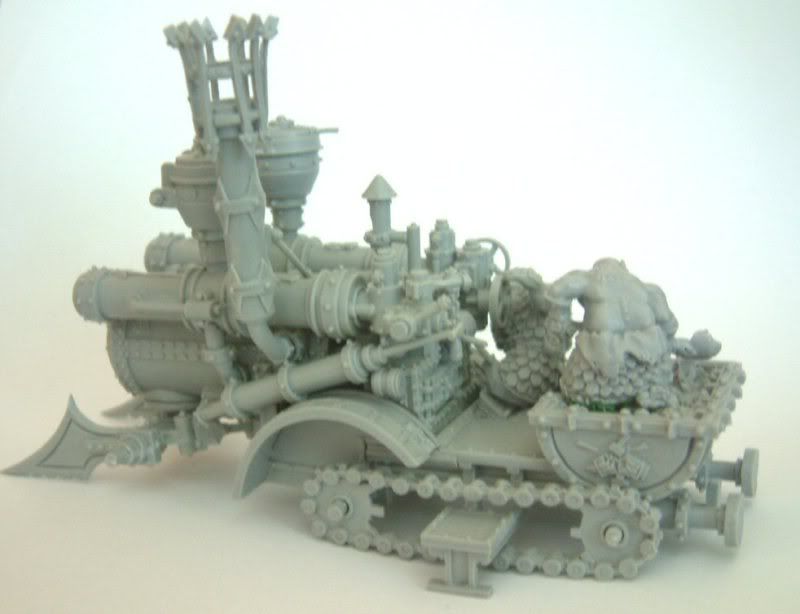
Starting from the first pic (attaching axles). Here I found that after I had attached the axles the drive chains were so tight on them that I had to reglue the front one again anyway. So I suggest holding the drive chains on as you glue the front and/or back axles. Then glue the chains on.
The left step plate in the diagram you should leave off until much later on imo. I had to reglue it at least 3 times and it’s just come off again (because of positioning the gunner).
Something I will do on the next Iron Daemon is to slice off the tubes that run down the top of the boiler. They are clearly attached underneath for casting reasons, which doesn’t look terrible, but they would look much better if you cut them off smoothed it all out then reglued some plastic rods. Especially at the back end (I did this on mine as I didn’t like the look of the blobs underneath).
Be careful you don’t cut off the air pump handle! I nearly did that thinking it was part of the sprue.
In the diagram the Single Levers are actually attached in different ways. If you look closely the side one is attached with the shallow protrusion facing out. Whereas the top one is upside down. I followed the diagram for this.
The cannons are a pain to hollow out. I’m going to greenstuff the inside later to cover over the mess and make it all pretty.
Onto the next page
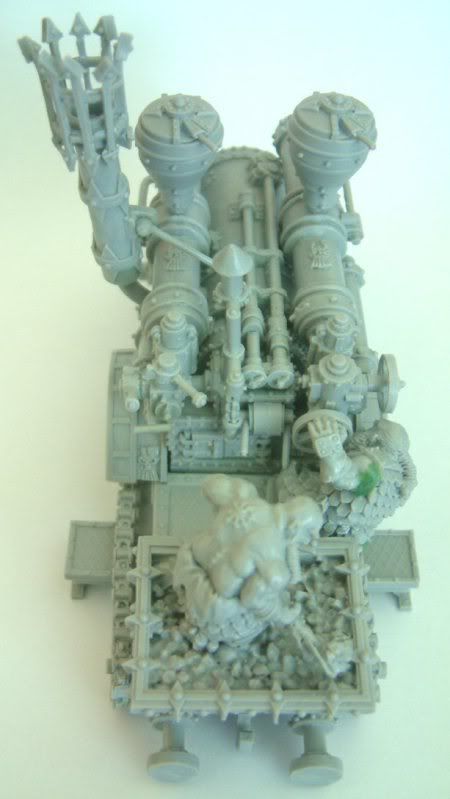
Something I noticed with the ammo feeds is that unless you are careful they can both tilt to the left (well, mine did anyway). So I tilted the right one out a bit.
The back control wheel was interesting because of where I put the gunner (I’m interested to hear how others are doing theirs). I cut a bit off the end so it was closer in.
The pressure gauge was a bit annoying to get sitting in flat. I had to cut a tiny bit out on one side.
The smoke stack support strut… :mad One of the harder things to attach at the right angle. Make sure you get it facing the right way round.
Twin levers went on reasonably ok, though I had to trim the pegs down a little as they were a tiny bit too long.
Smoke stack and smoke stack grill was a real pain to clean up. The hardest part of the model imo.
The Gunner was a real issue for me. The diagram shows him leaning right out. but if you look at the positioning of this he’s virtually falling off!?
I ended up pinning his foot to the pedals, cutting off his reaching arm and gluing it so it’s more over the control wheel. I’ll need to greenstuff the shoulder.
The whole of the front body section should clip easily into place, so you don’t need to glue it on until after painting.
Hope this helps people.
Thommy H:
It’s a beautiful model, but I know I’d end up hurling it against a wall so I must never, never buy it. Paint it well, everyone, I’ll be living vicariously through your efforts!
Grimstonefire:
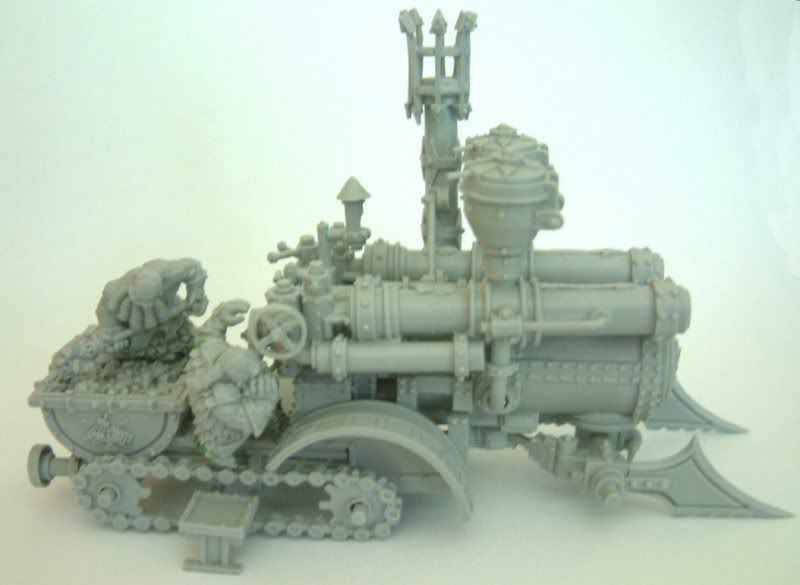
Another thing that struck me earlier is that I can’t base this until I know how wide the base of the bombard is, as I’d like them to all be the same size.
Edit. Seems the gunner is supposed to have the flat of his foot on the platform and his toe only on the pedal. Ah well.
fonejaker:
is there any chance to could post a photo of it next to a model for scale?
Im working on my skull cracker and dont know if its to the right scale.
Loki:
Thanks for the advice , it will certainly come in use when i am putting mine together
nitroglysarine:
Thanks for the pictures, helps with my conversion ideas 
Blue in VT:
Thanks for the info Grimm…looks very cool.
One quick question…is the guy shoveling coal a dwarf or an Ogre…he looks hugely broad across the back (probably from shoveling coal for years) and its hard to get an idea of his height due to his being bent over.
Cheers,
Blue
warh:
I want I want I want this model x.x. But I got so many other models I must finnish before I get this one 
nitroglysarine:
Thanks for the info Grimm...looks very cool.
One quick question...is the guy shoveling coal a dwarf or an Ogre...he looks hugely broad across the back (probably from shoveling coal for years) and its hard to get an idea of his height due to his being bent over.
Cheers,
Blue
Blue in VT
He does look pretty big, but I think its a topless CD, an ogre would probably fill the coal carriage. But I agree he
looks like one
fonejaker:
thanks for the photos bud!!!
how hard would you say it would be to magnetize the cannonades, so they could be removed for games when it has a skullcracker?
Grimstonefire:
I think what you’d have to do is cut the cannonades behind the ammo case things (the big bits sticking out ontop).
You could then put 2 pins in each (or drill out for a magnet) and it would hold on fine. That would actually be a very easy conversion.
The red lines here
aka_mythos:
The Skullcracker is an entirely separate model… so convert away.
Baggronor:
Mine should arrive soon.
How on earth do they load those cannons?
Thommy H:
Through those urn things on the top somehow? Is it supposed to be an actual cannon with physical ammunition or does it just spit fire or something? Either way, it really is an impressive kit, but I will finally snap and go on a murderous rampage if I ever have to build it. My sanity is on a knife-edge as it is.
aka_mythos:
I think its a really awesome kit, but I think it’ll be more fun to build my own from scratch.
Blue in VT:
Mine should arrive soon.
How on earth do they load those cannons?
Baggronor
POSH!!! there you go letting reality get in the way again...;P
My guess is they have step stools they put on the ground each time they need to sponge and load...hahaha
Blue
zobo1942:
Hmmm. This thing looks like a daemon-tractor. Which is cool.
fonejaker:
thanks again for the help
iv made a skullcracker based on this image
http://en.wikipedia.org/wiki/File:Snow-blower.jpg
but its dripping with blood for some poor victim >:)
Grimstonefire:
I presumed they were gravity fed.
So the gunner twists the handle, which opens loads of valves etc. A ball drops into place in the cannonade, then he does something else which releases the steam. The ball flies out and another one drops into place instantly then is fired off.
Like a rapid fire cannon.
Or they could be large iron balls and fired off more like a proper cannon. Same principle though, all gravity fed.
@fonejaker
That would be funny actually if it sucked up enemies, mangled them up then sprayed them out at the side of the road.
