m3lvin:
Tutorial: Making rivets/bolts.
Hello!
I got asked on my blog how I made my Rivets/bolts on my models,
so I decided to make a small tutorial.
I copied the text here so more of you people got a chance to see it.
Perhaps it feels silly to make a tutorial on just making rivets/dots. It feels like it’s such a small thing, but it’s not.
When sculpting your own armour to your CDs the rivets/dots are a really important part,
and making them look good really boosts the overall look of the model.
It’s worth a try.
—
When I make my Rivets/bolts on my miniatures, I use two different technicues.
You could just roll tiny balls and dab them on, but the risk is that they’ll be in different sizes, oval, etc.
Therefore I started using a special übertool… a normal pen!
This is the ultimate tool for making small Rivets/bolts. you can even chose the diameter,
depending on which pen you use, 0,5mm or 0,7mm. just remember to remove the graphite stick.
an alternative to a pen, Is the metal pipes the are used in certain precision humbrol glues.
not certain of the diameter there though, but it’s smaller than 0,7mm.
.jpg)
Anyhow, as said, there are two different thecniques I use:
Type 1 is the most simpe, which anyone can use without any certain sculpting experience.
When using this technique, the rivets/bolts will be the same height level as the plate, it won’t piont out.
Sometimes it can look a little bit lazy/unprofessional doing this, but not if you dont overuse it.
Type2 requires a lot more patience/experience, but will look more professional.
These rivets/bolts will rise over the plate it’s applied on.
Step by Step: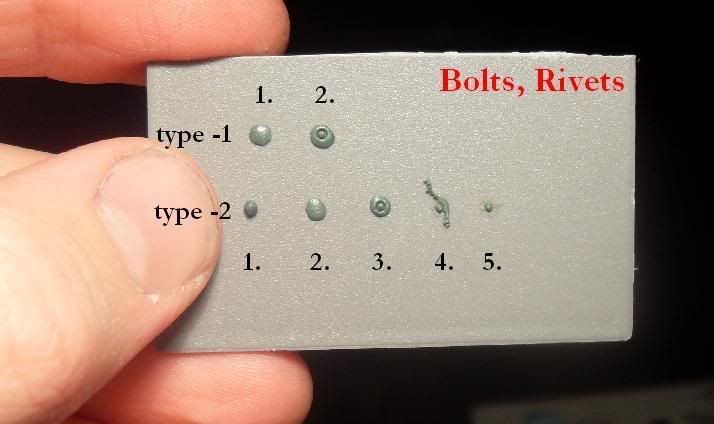
Type-1:
1. These rivets/bolts always has to be applied on an uncured part of greenstuff (a newly sculted shoulderplate for example),
which is in this stage represented by a blob of greenstuff.
2. With a steady hand, simply push the pen into the greenstuff.
you can decide how deep the recesses will be by pushing hard or soft.
just remember to dip the tip of the pen in water before pushing it into the greenstuff.
Also, make sure there’s no graphite stick in, otherwise you’ll just get a black dot.
Type-2:
1. Apply a tiny ball of greenstuff where you want the rivet/bolt to be placed. It’s very important that the ball is applied onto a part of greenstuff which is CURED, otherwise it wont work.
2. Push the ball to the thickness you want the rivet/bolt to be in the end.
3. Push a hole with the pen (use water). make sure that the pen goes the whole way thru down to the hard, cured layer.
4. Start removing the leftover greenstuff on the sides, I use a small hobbyknife or scalpel.
Cut a line from the inner circle all the way out.
If you pushed the pen the whole way through, you could now pretty easily remove the left over green stuff with the tip of the blade.
5. Finished! circural and perfect!
Examples of rivets/bolts:
model: Hobgoblin Hero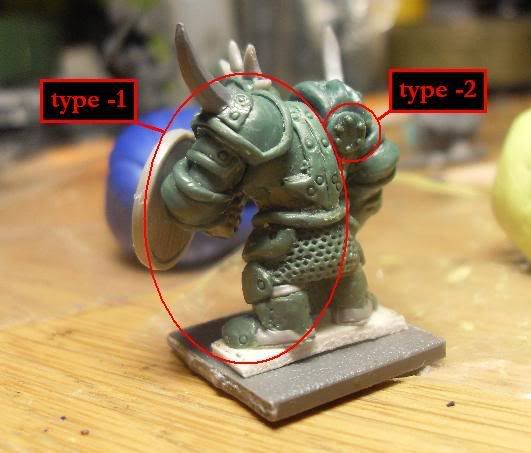
Hope this tutorial was helpfull!
:hat off
/melv
 [/align]
 I’ve been also experimenting with thick paint, you can do the same thing with that, and if your careful you can even put some embossed letters on swords etc.