Picked up the new Warhammer Quest Silver Tower game. From the perspective of the old Warhammer Quest game this is definitely NOT Warhammer Quest, but something similar. Make no mistake, it’s a different game, which should have been given a different name. GW is just cashing in on the name at this stage to help with marketing and sales.
At any rate, I’m optimistic that everything can be ported over to the old format, although the Hero models are generally taller (all except the dwarf) the board sections and enemies will all fit in nicely.
I wanted to add 3D boards to my WHQ collection, but looking at the new tiles for the game this is going to be challenging, to say the least. They are very detailed. Most of the board sections have a baked flood plain look to them, albeit with Tzeentch colours, so replicating this was my first challenge.
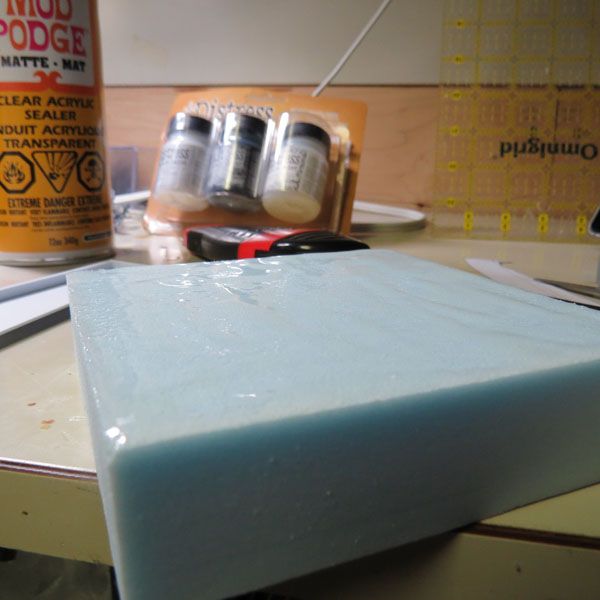
I used some material called Distress Crackle Paint. It’s really a gel that can be painted on. I painted this directly onto some extruded low density insulation foam (roughed the surface a little with some sanding first). It looks like hair gel initially when applied:
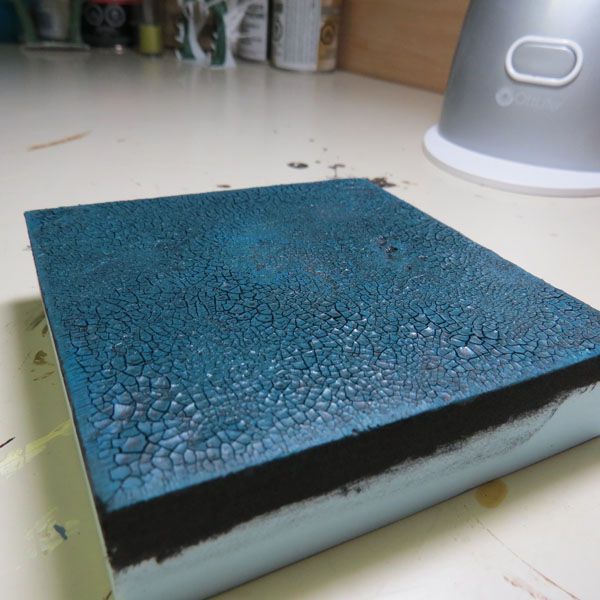
When it dries it creates random cracks that are of the same size and scale as those used on the board sections. I then hit this with several passes of Mod Podge matte spray so that I’d get an even coating. I opted for the spray over the brush-on variety as I didn’t want to disturb the cracked surface. The accelerant in the Mod Podge dissolves the foam, so in a few thin spots it distorted the underlying material, but I kind of liked it in this case as it was very subtle. Next time I’ll probably prime the foam first with some black acrylic paint before the crackle paint.
Once that dried I painted the surface with black acrylic paint and made sure to get into all the cracks. Priming with black first on the foam would make this step less critical, but I wanted the black base to work up from. I then mixed some dark blue and did a very generous dry brush until most of the surface was dark blue.
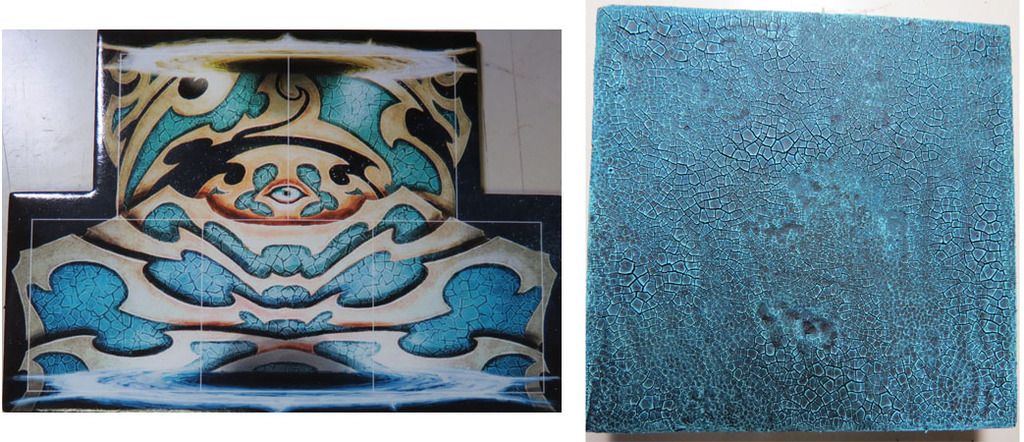
I then dry brushed blue and then a very light blue-green and finally some white for highlighting… pretty good start. I think to make the actual patterns I’ll cut the designs out of plastic, prime them and hot glue them down to the foam, then prime the foam and apply the crackle paint only where it is needed, instead of sticking the overlays down on top of the crackle paint.
With the layer of Mod Podge it’s pretty strong. I can pick it with a finger nail and it doesn’t come off. Once I give it a final spray with a triple coat of matte finish like I’ve done for my other WHQ boards it should hold up nicely!
The colours clearly need some tweaking and need to be lighter, but it’s a step in the right direction!
It wasn't anything fancy, just what ever I had on my terrain shelf.
I used Craft Smart acrylic black for the base, Mediterranean blue, and then a small amount of yellow and green mixed with the blue, followed by a lightened Mediterranean blue + white mix for the final highlight.
... still working on my Silver Tower as well as the missing doorways that should have come with the game. tisk tisk
Took some inspiration from some of the new Silver Tower artwork to design some of the missing elements for the new Warhammer Quest. What could be missing, you ask? The iconic doorway pieces that hold the board sections together, of course!
I’ve started with two of the doorways at the bottom of the above image.
The doorways on the board sections themselves show that the “doorways” are actually portals of light, I guess indicating that the Heroes are warping between rooms that could be located anywhere. I took the dimensions of the original WHQ doorways and made up a portal that’s sort of similar to the portals of light on the new board sections:
Comparison with the old doorways:
Next is bulking the doorway out so that it’s 3-dimensional and not flat:
And then filling in the gaps:
Here’s the finished portal
The intention here will be casting up a bunch of these doorways and then adding on some additional details to make some slight variations.
The other doorway I went with was the portal that’s reminiscent of the Gaunt Summoner’s headpiece (see artwork above):
For this piece I wanted both sides to be symmetrical so I only sculpted one and planned to copy it. The artwork suggests that this portal is much larger than a humanoid figure but I didn’t want it to be too unwieldy either. Here’s the old WHQ doorway for scale:
I used plasticard to make the framework of the structure and then filled in the majority of the gap with Bondo (autobody filler). Initially when you mix it it’s quite spreadable so I cut another piece of plasticard to use as a convex trowel and carefully applied it to both sides. It wasn’t perfect, but within 10-15 minutes I was able to scrape off some of the excess with an X-acto blade and then after 2h I sanded it down smooth.
Mould making:
Finished pieces:
Portal of light. I did another test piece with a small amount of yellow paint mixed with the clear resin and it set nicely, giving it a bit of a yellow tinge. I’m going to experiment with adding the yellow differently so that I get some strands of yellow inside the resin as opposed to having it mixed throughout. Not sure how that’ll go, but it’s an experiment for another time. The bottom part (floor) and the tendrils will need to be primed by painting it on, so that it doesn’t interfere with the transparent parts of the portal itself.
Tzeentch Archway 1 The bases of each of the pillars need to be angled a little differently so that the structures are more parallel, but it’s a promising start.
Now the finished pieces aren’t perfect and could do with more careful casting as well as prep work, but I was under some time pressure here as we’re moving into a new place in a few weeks and I needed to start packing up all of my hobby stuff as well as our work room where all of the magic has been happening :hat off
Anyway, I’m particularly excited about casting up more of the Tzeentch Archway pieces as there’s a lot of surface to work with for making variations, like covering it with eyes, or having blue flames rippling up from them, attaching strands of spider webbing between each side, or maybe even making a swirling portal that attaches to each side but looks as though you could pass through it or something could come out…
The doorway I really want to make most is the third image in the second row (top pic in this post). I started on it but soon realized that I had the scale all wrong and it was going to have to be 4-5x larger than I was planning, and it didn’t quite look right at my scale. In actuality that daemonic head is about 8x the height of a normal WHQ doorway. Maybe it’d make a good terrain piece instead of a regular board sections, actually. Given how disappointed I was with the one I made I’m going to have to give this one a good think!
The top row of pictures are what I’m using as inspiration for the Silver Tower itself. As it’s a magical structure, therefore, much like the TARDIS, it doesn’t have to be impossibly large on the outside. I’m thinking something suitably large for table-top gaming, maybe with a 12"x12" base, then the floating tower a little larger than that… more to come if I can get my new hobby room setup in July!
Highly interesting and impressive! The finished portals are damn good, and had well-chosen source material as well behind them. I enjoyed the read-through and am slightly awed you are actually casting such things almost on a routine basis for your collection. Most useful and inspirational! Can’t wait to see the Silver Tower come together ifor your dungeon.
So those Tzeentch doorways for Warhammer Quest Silver Tower were one of the last hobby things I worked on in our old house before we moved into our current place, which is easily 5x the size of the old one… and between renos and and my 80+ hour/wk day job it’s tough to finish projects… but I finally found my way back to the doorways.
I didn’t like the angle of the parallel cast doorways and decided to remedy the problem by detaching both pieces from the base and using some painter’s tape to get them parallel and then I go them both flattened on the bottom by making a few passes on the belt sander:
I also wanted some way of keeping the doors as parallel as possible when attached to the base so I decided to go with wood and screws. I decided to with with two pieces of wood recessed on either side of the foam base so that the wood sandwiches the foam in between and gives me some leeway with screw pressure. Unfortunately the base of the doorway columns is very short so I can’t screw too high up unto them and I can’t afford to leave that 10-15mm of tapered tip on the screws. I ended up cutting the tips off the ends of the screws with a pair of bolt cutters.
Everything screwed down and secured.
Now the next piece is that Tzeentch entry portal that’s drawn as a glowing doorway on the game board pieces (see bottom right image from the panel above). I made the doorway and cast a copy in clear resin. Over the 2 years the resin has yellowed a bit, but that’s actually ideal for this purpose as it’s supposed to be a yellow door anyway :hat off
I cut two recessed areas under the foam and put two coin battery LEDs underneath each of the columns so that each side is lit.
It’s a little difficult to show the effect in a photo, but here it is with the lights turned down.
Now I just need to paint up the base and the tentacles coming up the one side and it’ll be good to go. So many doorways so little time.